SS2 – Technical Drawing
Date:06/08/2020
Topic: Inscribing four circles into a square
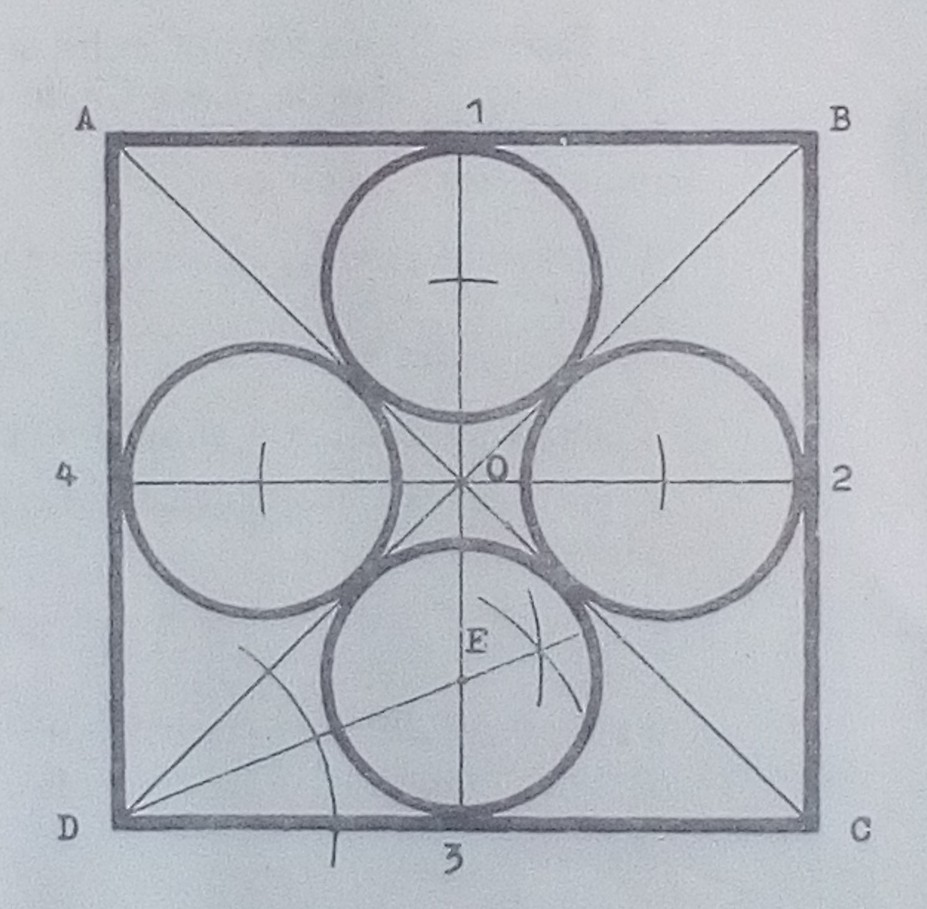
To inscribe four equal circles in a square, each to touch one side and two other circles.
Procedure:
1.Draw the given square
2.Draw th diagonals AC and BD
3.Through the intersection of the diagonals at O ,draw perpendiculars to the sides 1-3, 2- 4.
- Bisect angle OD3to give centre E
5.with centre O and radius OE, mark the remaining thre ise centres on the perpendiculars
6.with radius E3 and each of the centres, draw four circles.
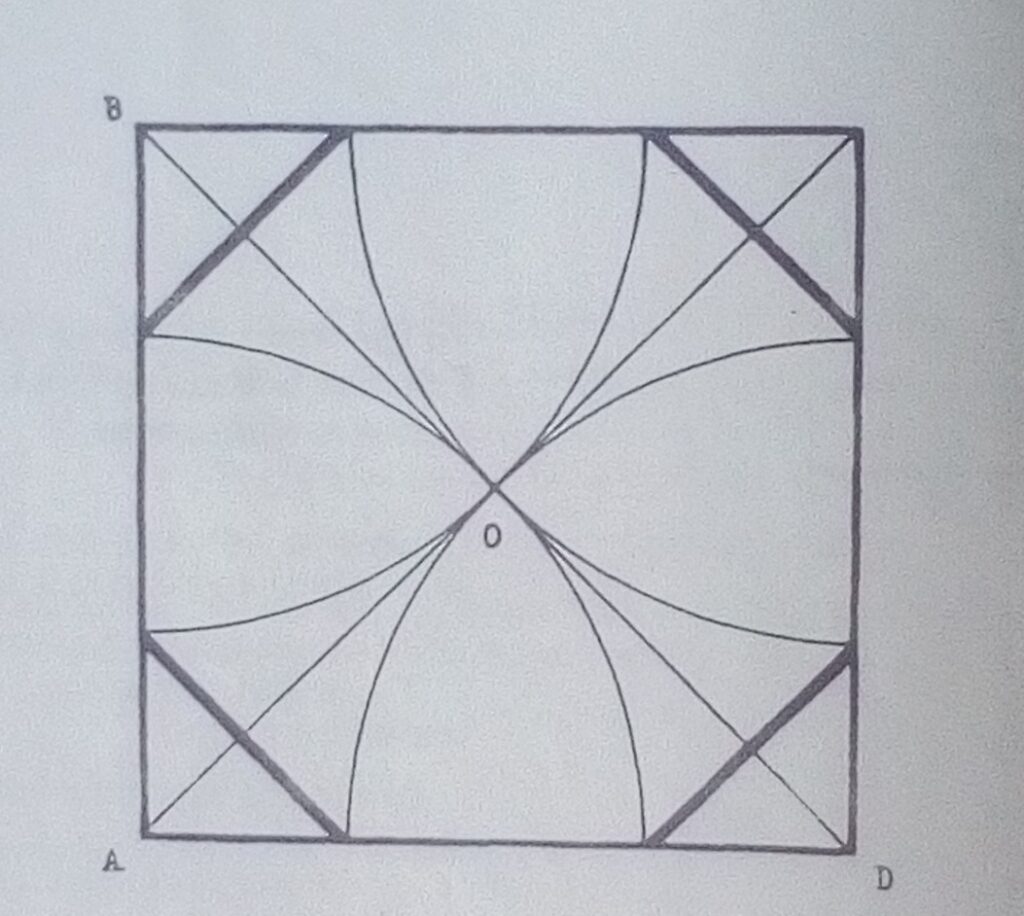
To Construct an Octagon in a square
- Draw the square ABCD
- Draw the diagonals AC and BD to intersect at O
- With centre A and radius AO, draw an arc to touch the sides of the square. Repeat for centres B,C and D
- Connect the points on the side of the square to complete the octagon.
Assignment
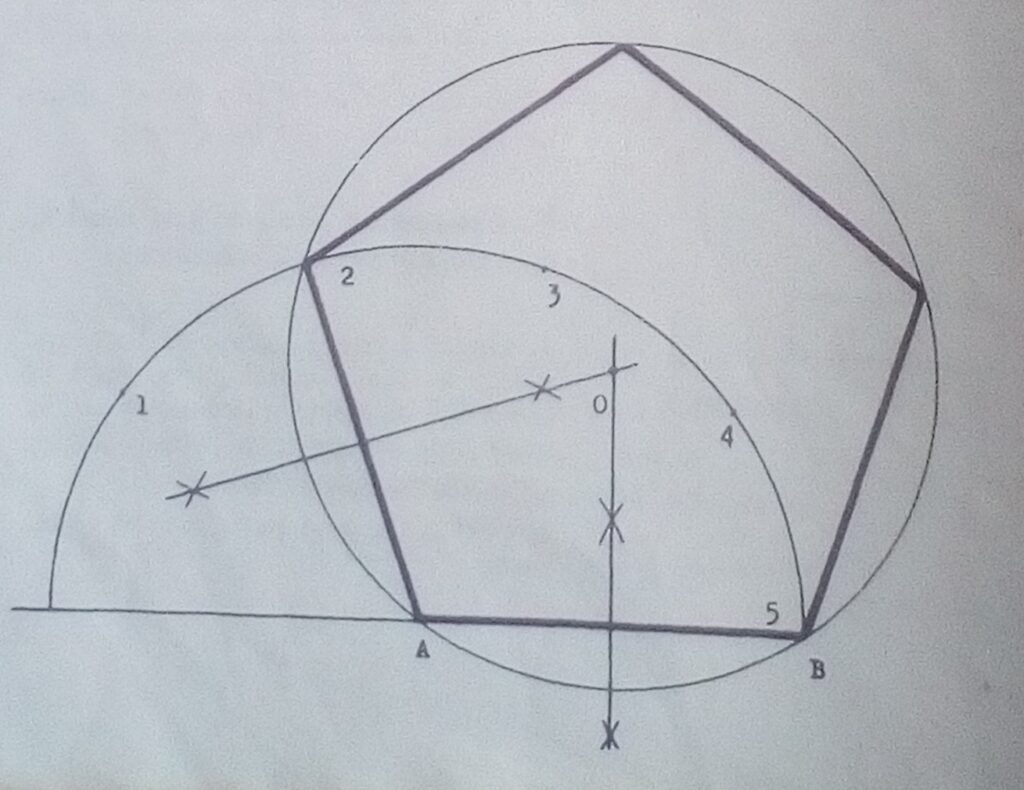
Go-to page 38 of JN Green and use general method to construct pentagon as shown below:
Using the form or email below: akinsamgambol@gmail.com
Write your name,subject, class, topic and email
SS2- Technical Drawing
Date: 02/07/2020
Topic: Inclined solids
In our previous lesson, we have discussed and understood how a solid is turned at an angle to the principal planes.
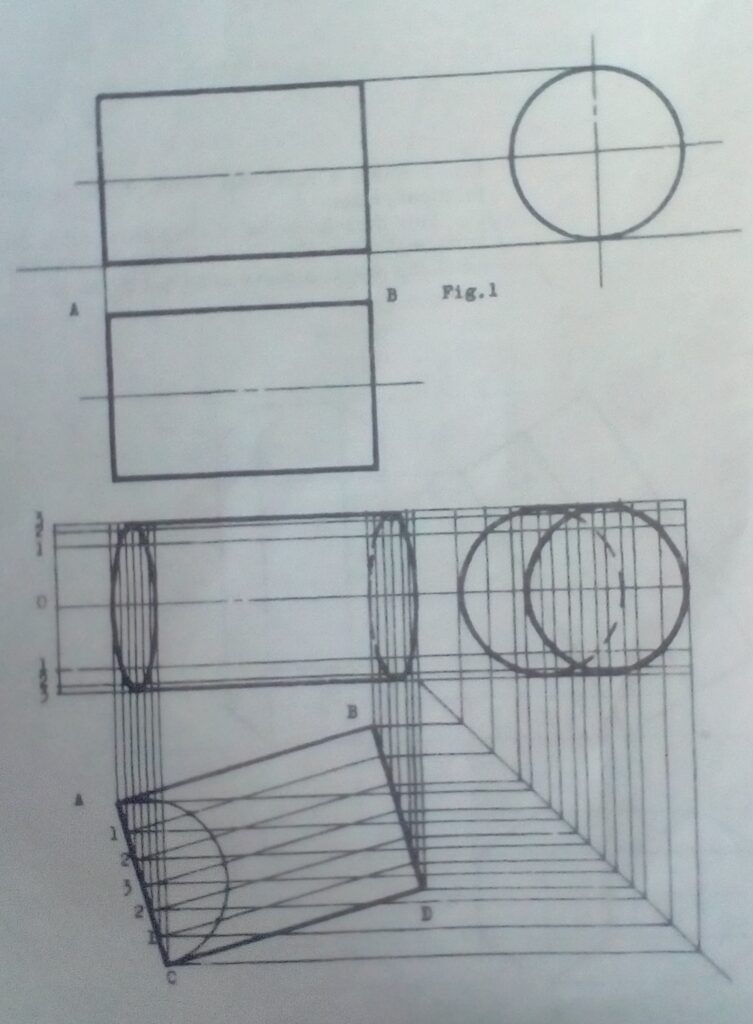
Now, let’s look at the stable cylinder drawn in first angle projection and how to construct it when its plan is Inclined at an angle as shown below.
Procedure:
- Turn the cylinder so that AB is inclined at 20degrees.
- Draw the front and end elevation and a plan
- Construct a semi circle on AC and continue as follows:
Assignment
The following diagram is a right cone parallel to the principal planes.
Hint: turn the cone so that AB is resting on horizontal plane as follows:Hints:see pages 114 & 115 of J.N Green for details.
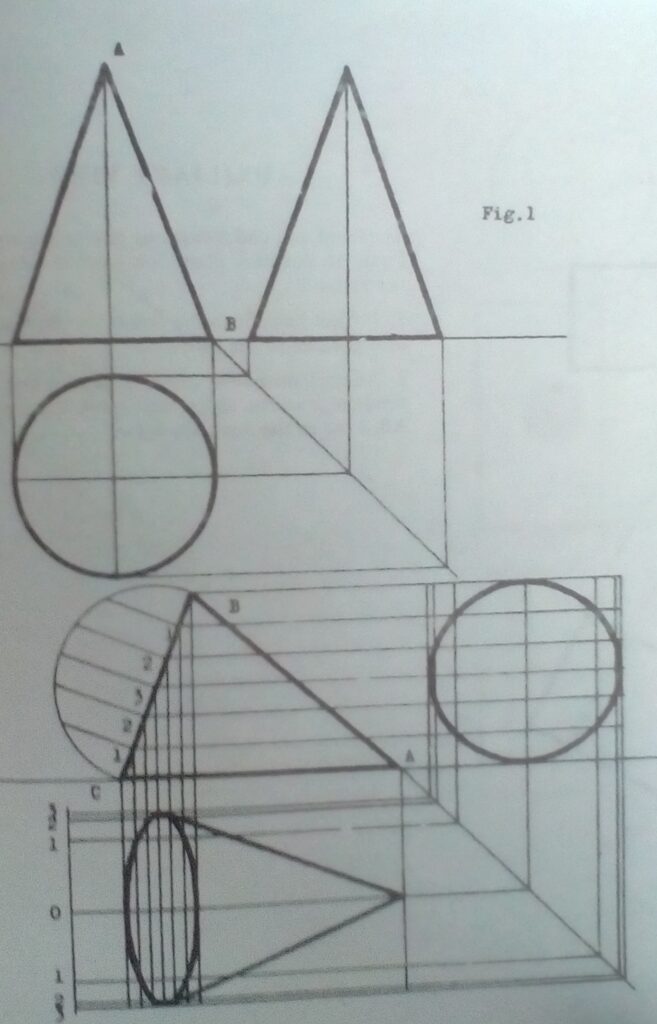
Using the form or email below:
akinsamgambol@gmail.com
Write your name,subject, class, topic and email.
SS2-Technical Drawing
Date: 27/08/2020
Topic: Equal Areas
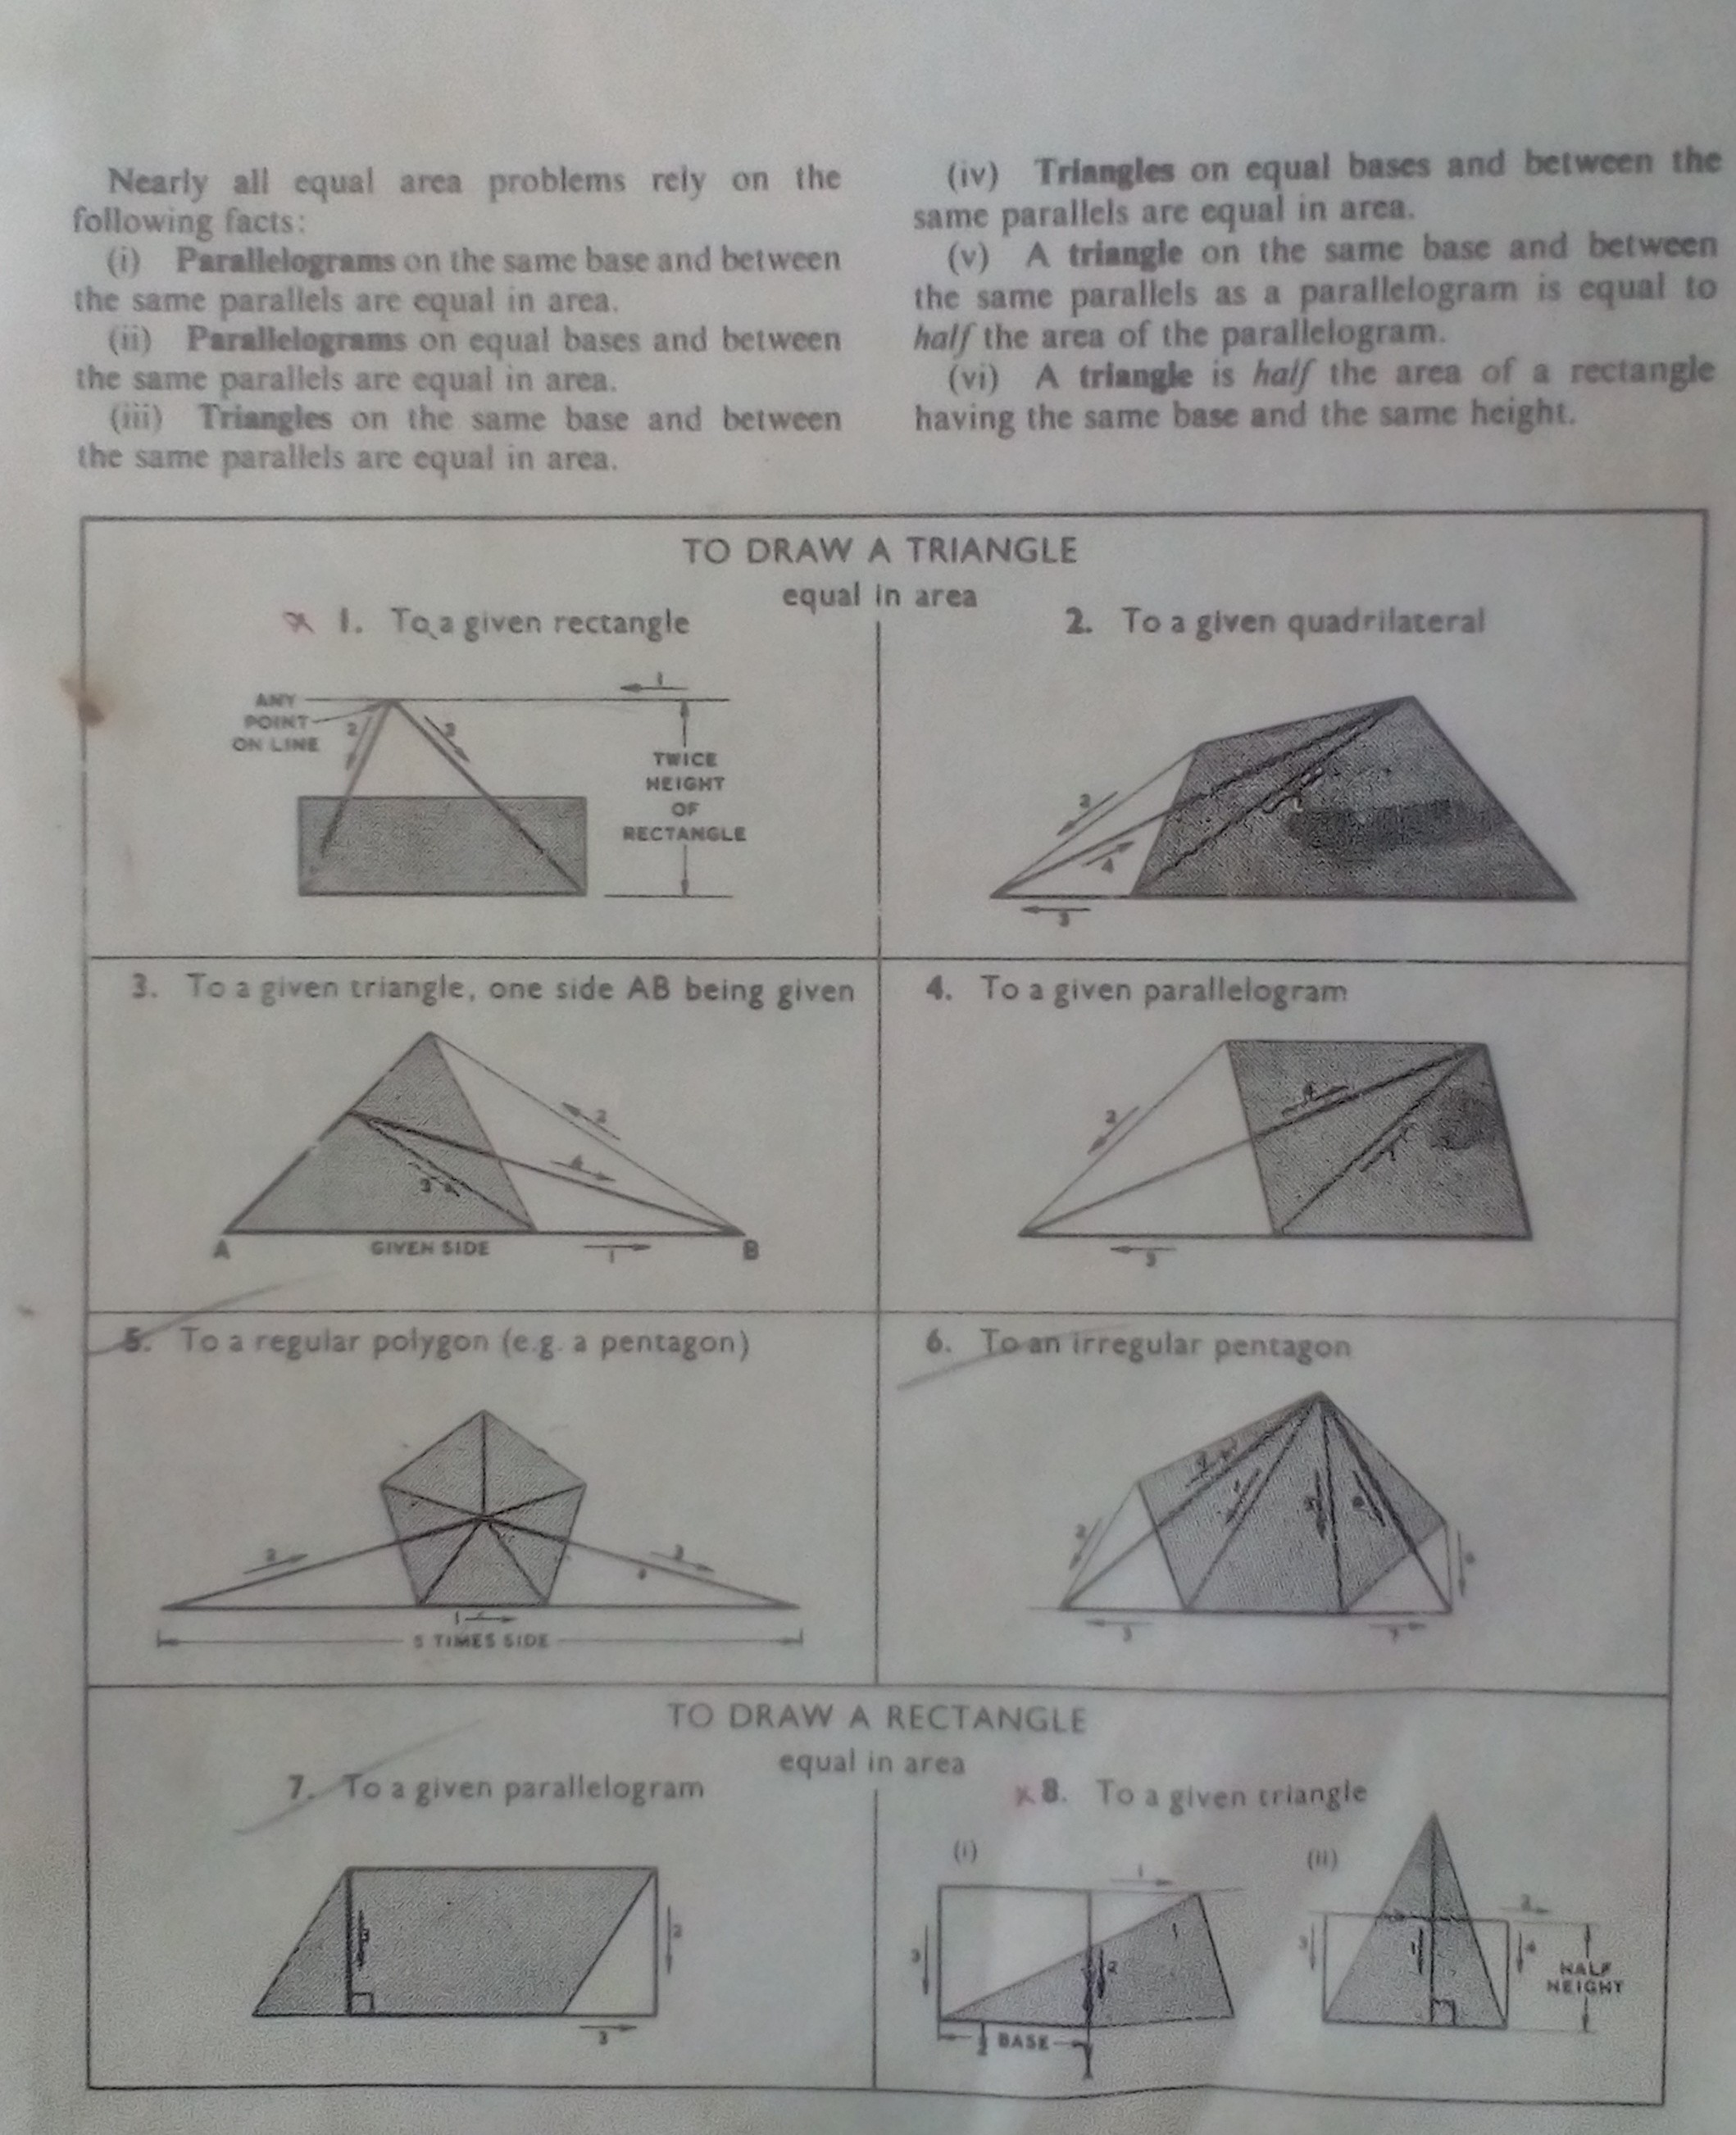
Considering the above application of Equal Areas of plane Figures.
Answer the following questions.
1.A pentagon has the following dimensions:
SIDE AB=40mm, sideBC=50mm, side CD=45mm, sideDE=70mm, . Diagonal BD=75mm, Diagonal AD=90mm, Angle DEA=90dergrees.
Draw this pentagon and by construction, reduce it to an isosceles triangle Equal in area to the pentagon.
2.Construct a pentagon ABCDE having sideAB=BC=CD=50mm.
Diagonal BE=CE=75mm
Angles EAB=EDC=110degrees.
Using the form or email below:
akinsamgambol@gmail.com
Write your name,subject, class, topic and email.
SS 2 –Technical Drawing
Date :20/08/2020
Topic : INCLINED SOLIDS
A solid turned at an angle to any of the principal planes is said to be inclined. The figure below shows a solid parallel to the principal planes. Turn the solid so that DC is inclined at 15 degrees to the vertical plane.
- Draw the front and end elevation and a plan. Draw the key view, the plan first as shown below:
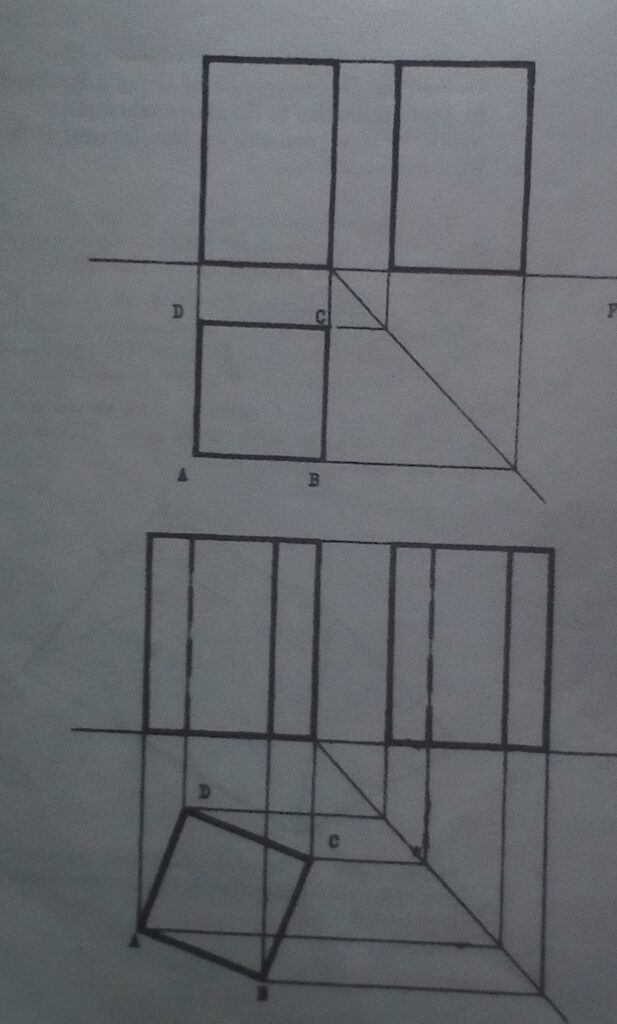
- Turn the solid below so that side AB is inclined at 60 degrees to the horizontal plane.
Draw a front and end elevation and a plan. Draw the key view, the front elevation first.
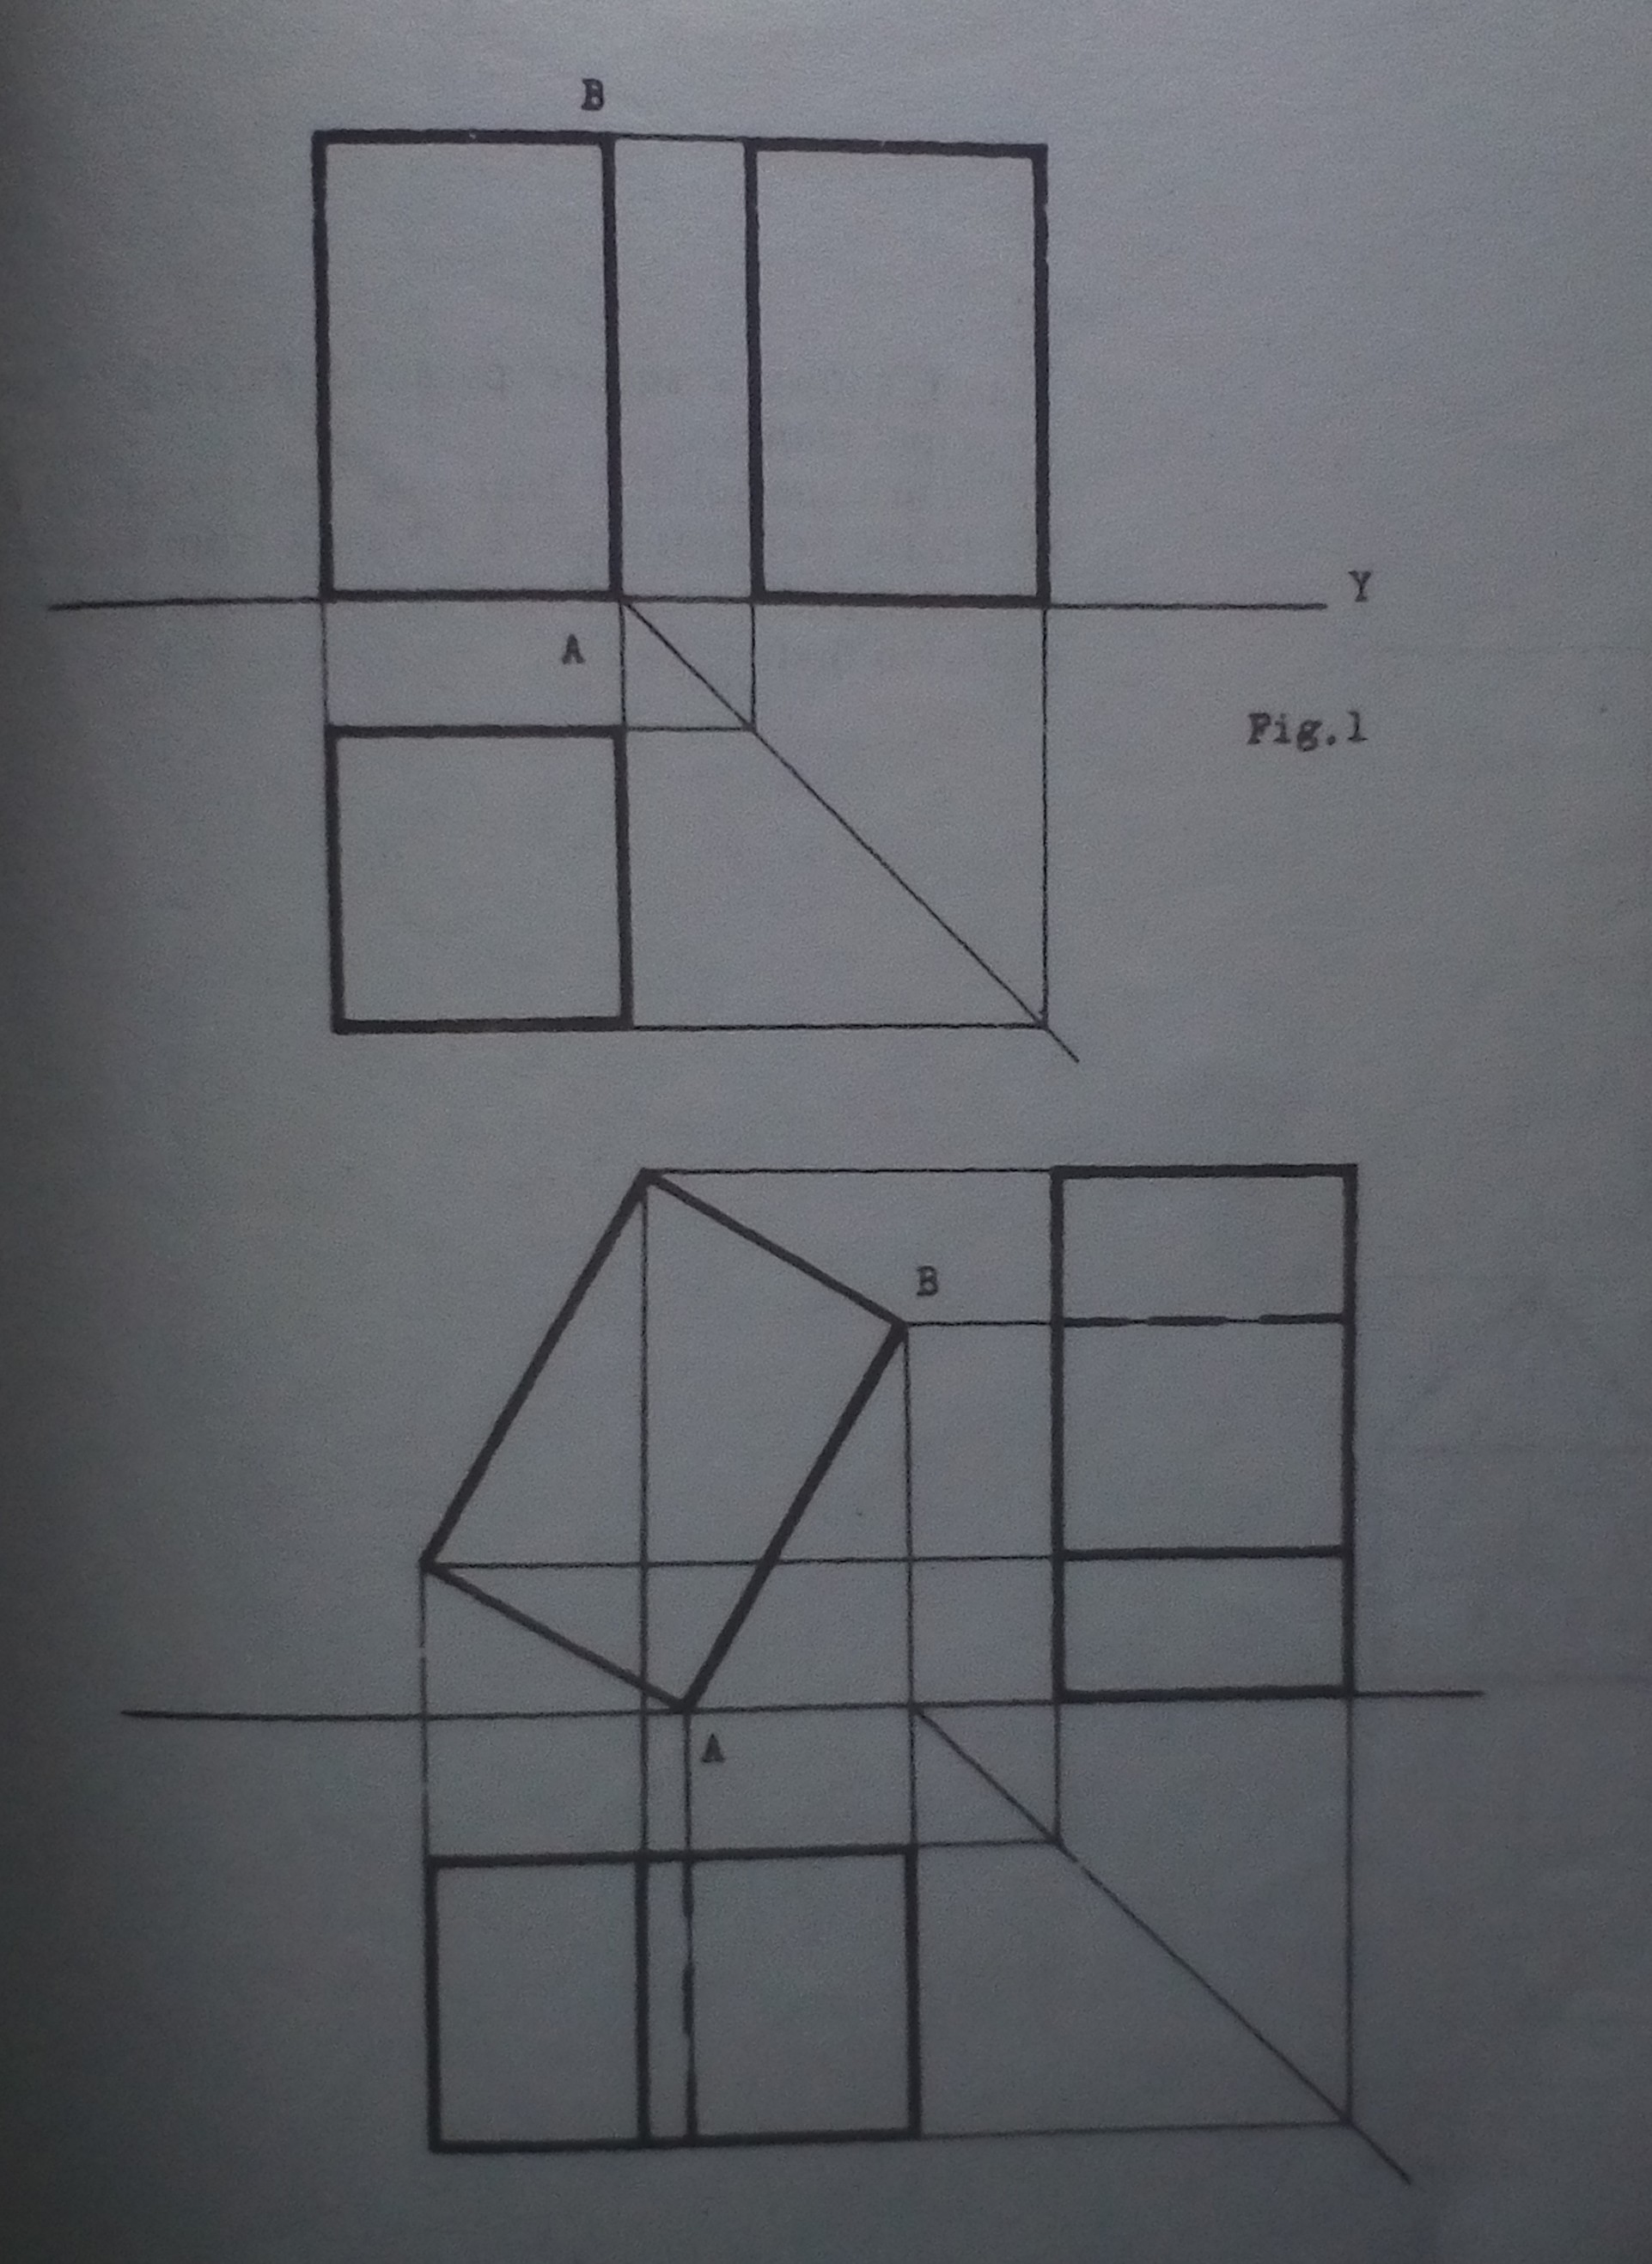
Assignment
The figure below shows a square pyramid parallel to the principal planes. Turn the solid so that side AB is inclined at 60 degrees to the horizontal plane. Draw a front and end elevation and a plan.
Using the form or email below:
akinsamgambol@gmail.com
Write your name, subject class,topic and email.
SS 2- Technical Drawing
Date:13/08/2020
Topic: Developments of objects
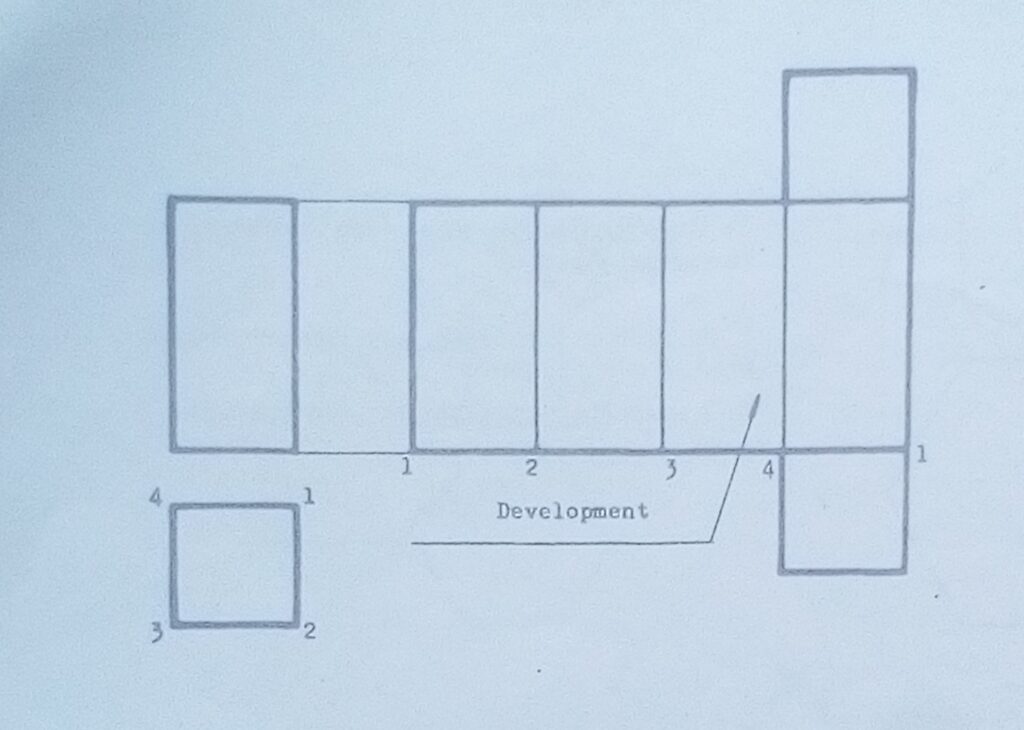
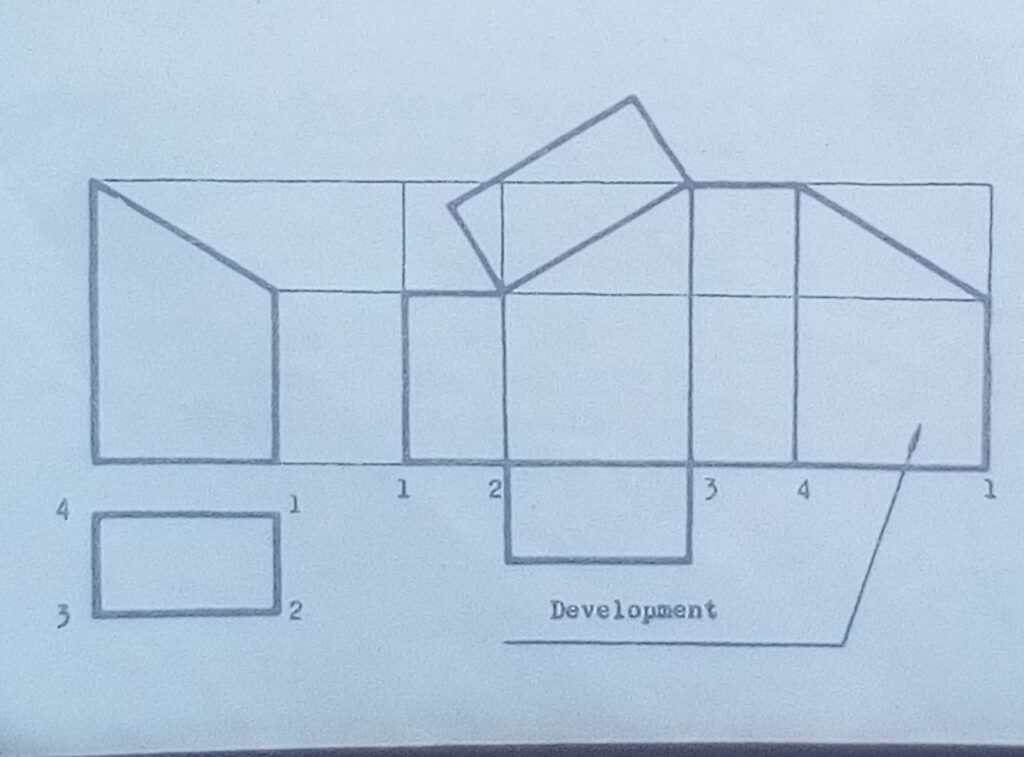
To draw the Developments of an object means to draw the shape of all it surface laid out flat in one plane. The development when bent along certain lines will form the shape of an object.
To Draw the Development of the square Prism
Procedure:
- Project lines from the elevation to obtain the height of the sides.
- Mark 1-2,2-3,3-4,4-1 from plan.
- Add the top and bottom as follows:
To Draw the Development of the Truncated rectangle prism
Procedure:
- Project lines from the elevation to obtain the height of the sides.
- Mark 1-2,2-3,3-4,4-1 from the plan.
- Add the top and bottom as follows:
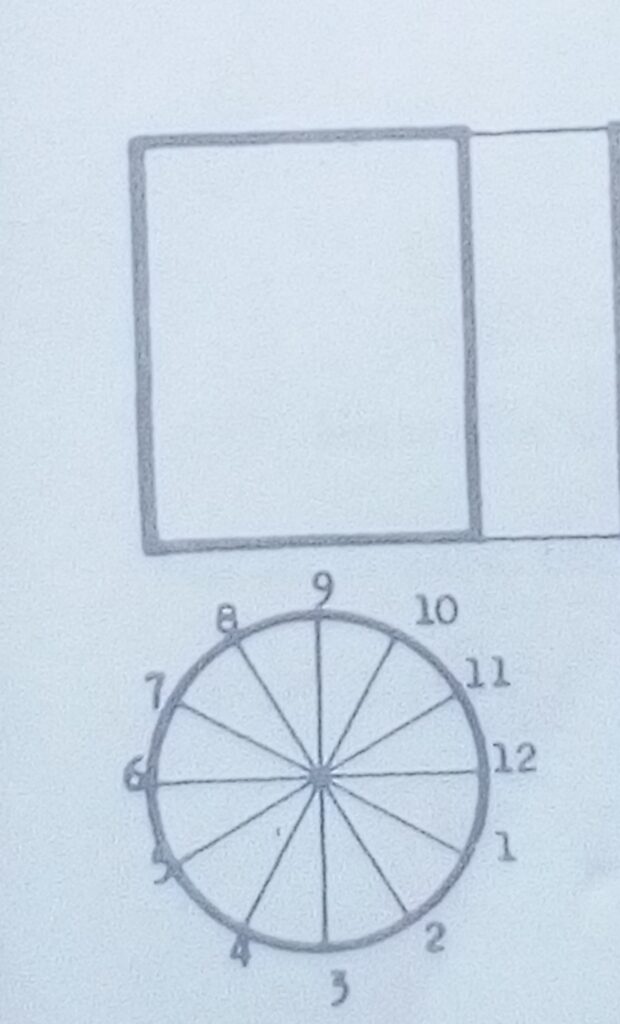
Assignment
- Draw the Development of the cylinder of diameter 50mm and height 70mm as given below:
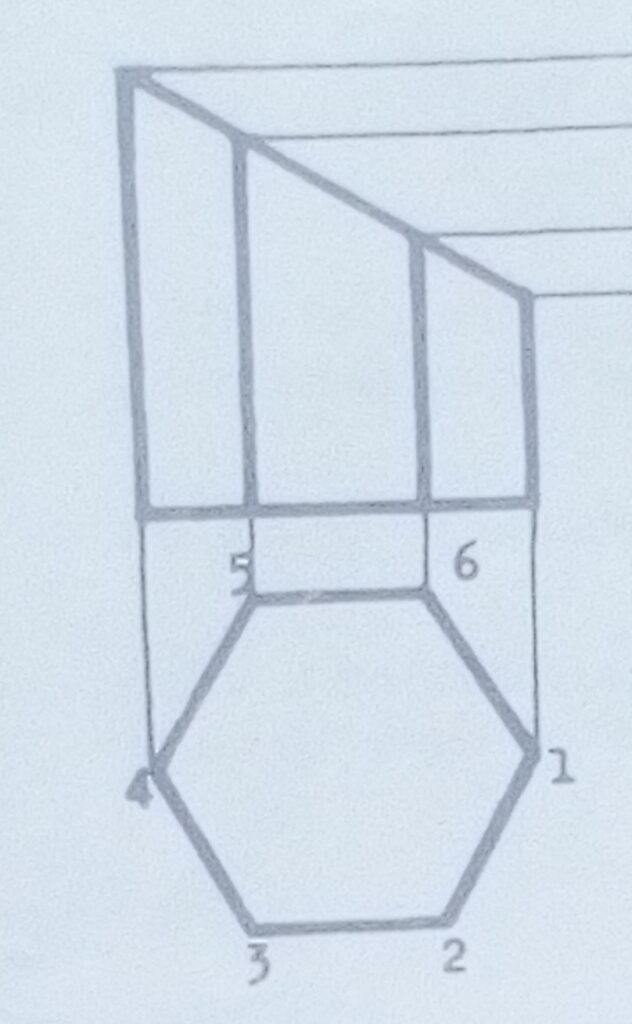
2.Draw the development of the frustum of the Hexagonal prism of side 20mm below:
Using the form or email below:
akinsamgambol@gmail.com
Write your name ,subject ,class ,topic and email.
Date: 04/06/2020
Topic: Sections in isometric Projection
Section means to cut off part of an object. It is done by the use of cutting plane called thick long chain.
We can draw sections on plane passing through any of the views given.
Let’s us consider the following isometric block and draw in 1st angle projection.
- Front elevation in the direction of arrow A.
- Plan
- Left end elevation
- Section on plane XX

SOLUTION

Assignment
According to the following block. Draw in 1st angle projection.
- Front elevation in the direction of arrow Y.
- Plan
- Section on plane XX.
Using the form or email below and the upload link at the top of this page.
Write your name, subject, class topic and email.

I
No Fields Found.SSS 2 – TECHNICAL DRAWING
Date:28/05/2020
Topic: Principle of Tangency
The principle of tangency involves the use of compass to constructobjectshaving curves and circular shapes in Engineering works
Terms used in this construction are:
1.Tangent:Which is a straight line drawn to touch the side of a circumference of a circle
2. Point of contact: This is a point at which the Tangent touches the circumference of a circle.
3. Normal: This is a line drawn from the Centre of a circle to meet the Tangent at 90 degree.
To Draw an Internal and an external Arc of Given Radio to Touch Two Given Circles
Procedure:
1.Draw the given circle of radius A1 and B2.
2.Let the internal arc radius be r and the external R.
3. To Draw the internal. WithCentre a and radius r+A1,Draw an arc. WithCentre B and radius r+B2,Draw an arc to cut the previous one at C. Join C to A and B with center C and radius CD draw the arc.

4.To draw the external Arc. With center A and radius R-A1, Draw an arc. with CentreB and R-B2, draw an arc to cut the previous one at E. Draw a line from E through A to F and a line from E through B. With
Centre E and radius EF draw the arc.
Assignments
Use principle of tangency to construct the following figure using the form or email below to respond/submit and attach your files to the upload link on top of this page.

akinsamgambol@gmail.com
Write your name, subject, class, topic and email
No Fields Found.Hellow students. How are you and hope this lockdown has not disoriented you. You are welcome to this platform. Now, let’s get down to business.
REVIEW OF 2nd TERM WORK
INTERPRETATION OF CUTTING PLANES ON ORTHOGRAPHIC PROJECTION
- When a cutting plane is passing through the front elevation Horizontally, the object produced resembles the Plan.
- When a cutting plane is passing through the front elevation Vertically, the object produced resembles the End elevation.
- When a cutting plane is passing through the Plan Horizontally, the object produced resembles the front elevation.
- When a cutting plane is passing through the Plan Vertically, the object produced resembles the End elevation.
- When a cutting plane is passing through the End elevation Horizontally, the object produced resembles the Plan.
- When a cutting plane is passing through the End elevation Vertically, the object produced resembles the front elevation.
ASSIGNMENT
According to the interpretation above, answer this question in first Angle Projection using the form (s) below.
